|
Do It Yourself
This
is my radon mitigation project of 2004.
I hope it servers as a learning tool that
can be improved upon. It may not be elegant, but "judge
only by results."
Caution
Radon mitigation is serious business.
It involves alterations to the structure of your home. Installation
of electrical circuits are best left to professionals. De-pressurization
of crawl spaces and slabs can cause negative pressure in living
spaces which may result in a backdraft condition for
gas
appliances, causing carbon monoxde gas to leak into the home.
Luckily, my house happened to have direct vent appliances, but
at the time I did the installation, I did not check for back
draft conditions. After taking the Residential Radon Measurement
and Mitigation Provider Courses, I realized the potential dangers
of not checking for back drafts. Please, only attempt a do-it-yourself
installation once you have read Doug Kladder's book (above)
and are prepared to make a safe installation.
Caveat
I
write this as a do-it-yourselfer to others who may want to do
it themselves, but I can only assume liability for my own installation.
You can use this information as part of your research, but I
cannot assume responsibility for how you put it use.
Testing
in
1988, after years of hearing about radon, I was somehow motivated
or curious enough to send for a test kit and test my house.
That summer I received in the mail a lab result that showed
my test had found levels of 2.3 pCi/L, below the 4 pCi/L action
level recommended by the EPA.

The literature recommended a follow-up test, but I became too
busy with "life" and the results were not "that
bad" so I put the project on the back shelf. I did buy
a book on radon, Radon, The Invisible Threat, by Michael Lafavore
(still available on Amazon under used books, see Connections),
which I never read, until just now. As the years went by I always
wanted to get back to that follow up test, but it never climbed
up the priority ladder on my list of things to do.
 I
don't exactly know what got me going again, but in the winter
of 2003/2004 I finally took the time to search on the Internet
and found a new radon testing device called the Safety Siren
Pro Series II Radon Detector. I wanted a unit I had more control
over than a one-time charcoal test and this little unit looked
portable, re-useable and the catalog recommended it, so I took
a leap of faith and purchased the tester. I
don't exactly know what got me going again, but in the winter
of 2003/2004 I finally took the time to search on the Internet
and found a new radon testing device called the Safety Siren
Pro Series II Radon Detector. I wanted a unit I had more control
over than a one-time charcoal test and this little unit looked
portable, re-useable and the catalog recommended it, so I took
a leap of faith and purchased the tester.
When
the unit arrived, I plugged it in and within days noticed readings
of 2 - 3 pCi/L. This was in the spring of 2004. By Summer and
Fall the readings were up to 3 - 4 with the annoying alarm going
off at 4 so it encouraged me to go to the next step, which was
to buy tarps to cover the crawl space (see below). By winter
I was getting readings of 5 - 6 pCi/L.
Plans
I
searched on the Internet for plans and found a company called
Infiltec which has diagrams
of about every mitigation installation you can imagine. I printed
out the ones that seemed to match my house construction and
then talked to a few radon supply companies to confirm that
I was designing according to current specifications. The design
I was following showed a plastic barrier on the ground in the
crawl space attached to the stem walls, with a perforated pipe
under the plastic, running down the full length of the crawl
space. The perforated pipe was then attached to a PVC pipe that
curved up and out a hole in the stem wall and attached to a
fan that vented it up through the roof overhang.
The
Design
The
idea was to use a low volume fan to create a small negative
pressure in the perforated pipe under the tarp. Then whatever
radon gas in the soil that was migrating up into the crawl space
and then into my house, would be drawn toward the slight negative
pressure in the pipe and be exhausted up the flue on the side
of the house, through the eve of the roof and be dissipated
in the air above the roof. This method does not actively vent
the crawl space because the radon is removed from under the
tarp before it has a chance to get to the crawl space. This
assumes that there are no leaks in the tarp and the duct tape
will seal the tarp edges forever, which is probably not the
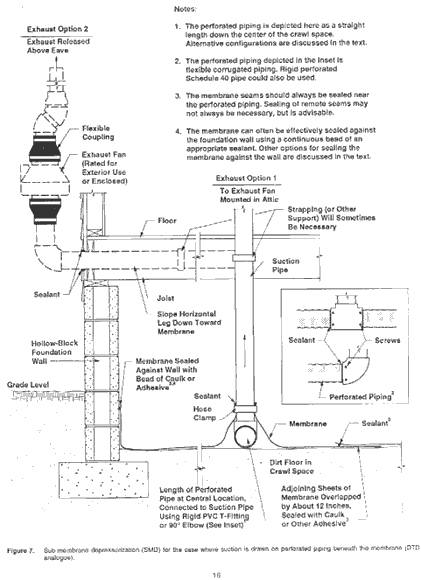
case with my installation. More on that later.
Crawl
Space Plan
from Infiltec
Slab
Foundation Plan
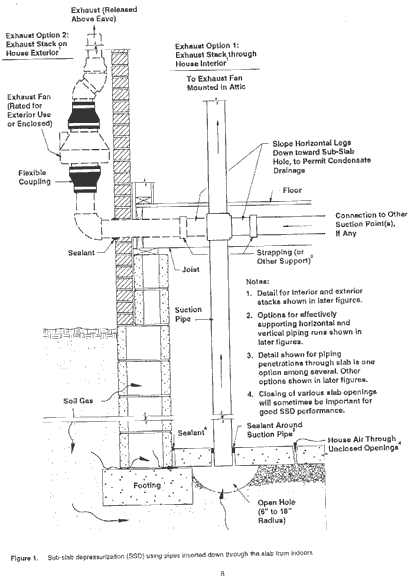
I
have not installed the slab foundation plan, but I am told that
home owners with this foundations can do the job relatively
easily and cheaply, compared to the crawl space system I attempted.
According to some folks I spoke to, you need to jack hammer
out an 18 inch round hole in the slab and dig down about 6 to
10 inches. Then you insert a 4 inch PVC "T" into the
hole and attach a 4" vent pipe to the end of the"T"
sticking up into the room. You then cover the open ends of the
"T" with breathable drain cloth to keep the dirt out
of the pipe, cover the entire "T" up with gravel so
it will take the weight of the cement, and then fill in the
hole with cement. I was told that this can be done in a closet
and the vent pipe run up to the attic where the fan is installed
and the vent pipe rises through the roof. The negative pressure
in the "T" will cause the radon under the entire slab
to migrate to the pipe and be vented out. Sounds amazingly simple
without having to purchase or install tarps and drain pipes,
which was a pretty big job.
(Note:
This is a general, uneducated, hearsay description, not intended
as a plan. If you plan to install this type of system, get some
good installation books (see Doug Kladder's book above) or hire
a professional mitigator).
The
Crawl Space
A
friend of mine had just used some heavy duty poly tarps to replace
the torn plastic vapor barrier in his crawl space. His goal
was not radon control, he just wanted a good vapor barrier and
to make his crawl space cleaner when he had to crawl under the
house to tack up insulation or run stereo wires or whatever.
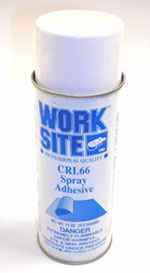
I thought that silver tarp would also do the trick for a radon
barrier (though now, if I had it to do over, I have found some
rolls of nylon-reinforced 6 mil plastic sheeting that would
have made less seams to seal. Also there is a spray adhesive
that is a better method for sealing seams than the duct tape
that I used. See the product list at the end of this page).
So I made the trip to Carson City Home Depot and bought 3"
perforated drain pipe (used for French drains), 3" connectors
and 90's, double-thick silver and brown poly tarps, and plenty
of good quality duct tape. Truthfully, it took me two additional
trips to Home Depot to get enough tarps and duct tape to cover
the entire 1000 s.f. crawl space. At the end of the three trips
I had spent $232.39 on supplies.
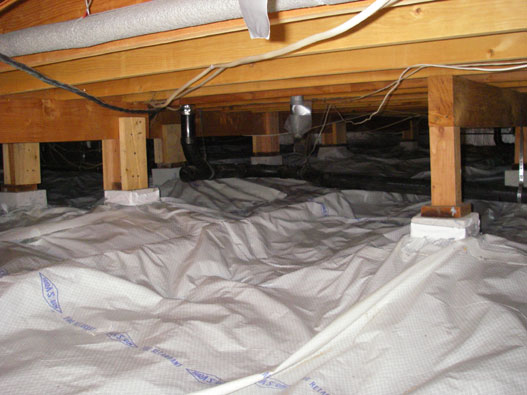
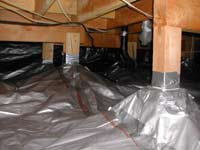
Note: The picture at right shows the tarp being staples to the sill plate. This is NOT a recommended installation! The radon barrier cloth should be glued to the concrete foundation wall well below the sill plate. Moisture can rot out the sill plate and termites can get into the house behind the tarp. This installation is being fixed. Use the correct adhesive the first time, not like me!!
The
Perforated Pipe
To lay the drain pipe I simply attached the 4 10' sections of
rigid drain pipe together with the connectors and laid the 40'
down the center of the crawl space. I had to cut off about 4
feet with a hack saw to make it fit. I then used a 90 to bend
the pipe up toward the floor over head. At this point I adapted
the 3" pipe down to a 2 1/4 PVC pipe to fit through a 2
1/4 hole I already had drilled in the stem wall. I used good
old duct tape to make it all fit. (Later I undid this setup
and used 4" ABS to go through an existing air vent in the
stem wall).
The
Tarp
To lay out the tarp I needed the help of someone who wouldn't
mind spending hours working in a cramped, dusty and dirty crawl
space. Luckily my neighbor's son, Justin, had proved he was
not afraid of hard work when he helped me with a difficult landscaping
job that summer and he was willing to pull on the coveralls.
I insisted on paying hazard pay. We donned coveralls, dust masks,
gloves, hats, and grabbed tape measurers, flash lights, extension
lights, duct tape, staplers, scissors and climbed in. We laid
out the first tarp by the door and taped and stapled it to the
stem walls. We allowed it to drape down to the dirt floor and
run across the floor to the concrete and wood posts lining the
center of the crawl space.
 We
took some scrap tarp squares maybe 3 feet on a side and cut
them from a corner down to the center. We wrapped the squares
around the posts so the concrete base was covered and the upper
wood post was covered and we used duct tape to secure the square
to the post. Then when we pulled the tarp across the floor to
where the first post was, we cut the tarp and laid it around
the base of the post which was already wrapped with the tarp
square. Thus when we taped the tarp to the post we were really
taping the tarp to the cut square so our tape was able to get
a good grip and eliminate air pockets. We
took some scrap tarp squares maybe 3 feet on a side and cut
them from a corner down to the center. We wrapped the squares
around the posts so the concrete base was covered and the upper
wood post was covered and we used duct tape to secure the square
to the post. Then when we pulled the tarp across the floor to
where the first post was, we cut the tarp and laid it around
the base of the post which was already wrapped with the tarp
square. Thus when we taped the tarp to the post we were really
taping the tarp to the cut square so our tape was able to get
a good grip and eliminate air pockets.
We
worked around the crawl space starting at the stem walls and
working our way to the center, dealing with each post as we
had the first. We used plenty of duct tape to seal all the overlapping
tarp edges where two tarps joined. In the center of the crawl
space where the perforated pipe lay, we simply laid the tarp
over the pipe without taping it, and continued to the next tarp.
The job was difficult crawling under the house to lay and tape
the tarps. It took two of us 6 hours one day and 7 hours the
next, for a total of 13 hours under the house. So, with hazard
pay, my helper's labor bill came to $206, or $15.85 an hour
average: twice the bargain at any price - Thanks Justin!
Note:
The tarp in the above photo should be glued to the concrete
pier, not to the wood! This installation has been fixed, see
photos at bottom of page.
The
Fan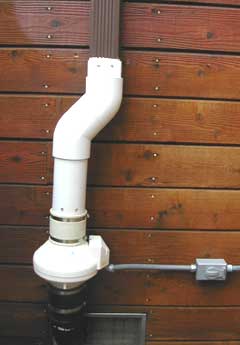
After some searching, I happened on an Internet source for radon
supplies with the unlikely name of radon
supplies.com. They had a catalog with good photos and helpful
people who,though they disclaim being designers, gave me confidence
that my design should work. I described my system and said that
I wanted a fan with very low air volume because I was not moving
air, but rather creating a negative pressure under the tarp.
The radon gas in the soil would then migrate toward the negative
pressure in the perforated drain pipe and be drawn up the flue
along side my outside wall to the outlet on the roof.
We
picked out a Fantech fan that we thought would meet my low pressure,
low volume needs. We choose the Fantech
HP series # HP2133. It a low 14 to 20 watt rating and a
low .17 max amps. I thought this fan should be cheap to run
and quiet. It is both. I think it should last a long time as
well, though that's to be seen. From the folks I have spoken
to, these fans last about 7 to 8 years of continuous operation,
if condensation problems are eliminated (see below). Cost: $133.
The
Drain Pipe
Warm air from under the house contains a fair amount of moisture
which will condense out in the uninsullated pipe in the winter.
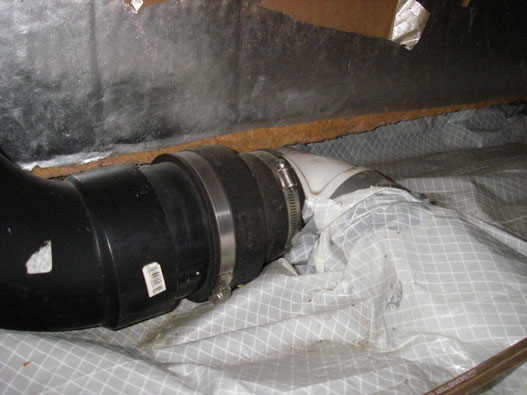
I found a company, when I took the Radon Mitigation Certification
Course in Colorado Springs, that has developed a special drain
pipe that allows moisture to drain out in the winter. It is
located right above the fan. You can see the small drain holes
above the white coupling. I am able to supply these special
drain pipes to anyone installing a system in the Tahoe area.
Call for prices. After taking the classes on testing and mitigation,
I discarded my original insulated pipd and changed regular 4
inch metal drain pipe which matches the color of my house and
looks just like a normal drain pipe.
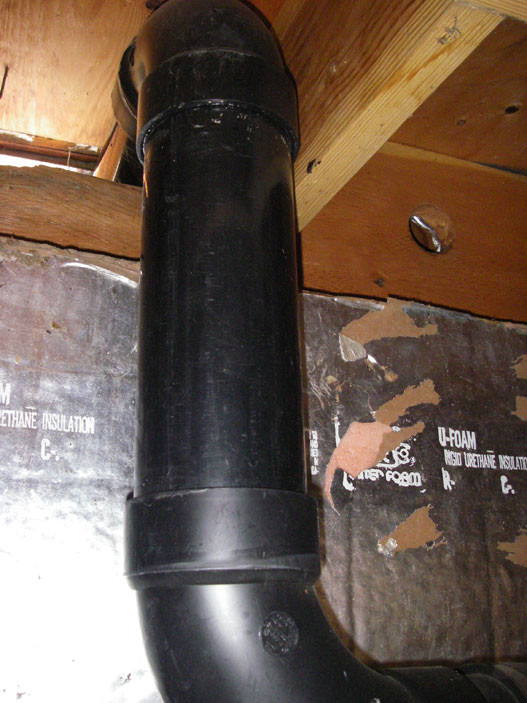
The
couplings and adapters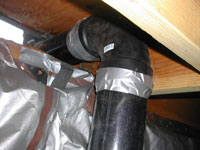
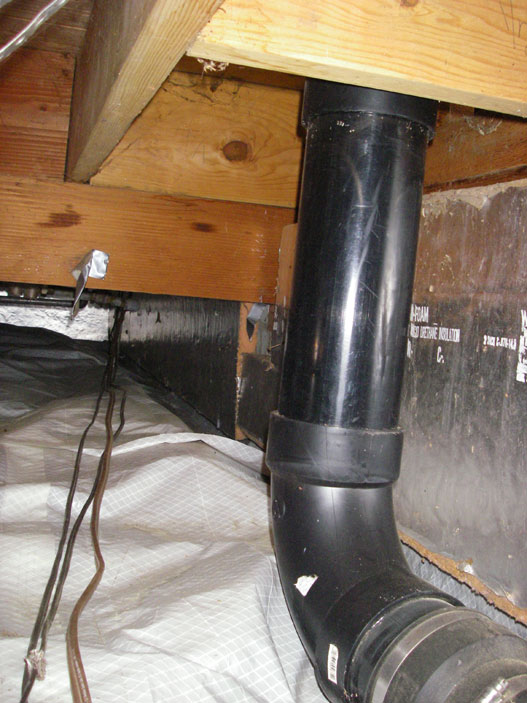
Originally I made the mistake of adapting my 3" perforated
pipe down to 2" PVC to get through an existing hole in
my stem wall and then adapting the 2" PVC back up to the
4" opening in the fan. Bad design. Too many changes in
size to allow the fan to create enough negative pressure to
extract the radon from the soil, and costly to purchase all
those adapters. So I decided to replace the adapters with 4"
ABS all the way from the 3" perforated pipe to the 4"
opening in the fan.. I purchased "sweep 90" ABS connectors
to make the 90 degree bend more gradual and less restrictive
on the air flow. After this picture was taken I took
off the duct tape and used ABS glue to seal the joints.
Note:
See picture below and additional pics at the bottom of this
page for re-make of this installation.

The
Air Vent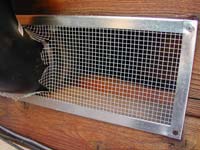
I now needed to get through to the outside of the house. I asked
a friend if I could borrow a hole saw to expand my 2 1/2 inch
hole in my stem wall and he said: "Why mess with the hole?
Just take the pipe through one of the air vents" Well....ok!
There happened to be an air vent very near the 2 1/2" hole.
I removed the louvered air vent screen (about 7" x 13")
and replaced it with a simple, non-louvered air vent screen.
I cut a 4" hole in the screen material and shoved the 4"
ABS through it and screwed the screen back in place. Done, finished,
and no hassle trying to drill a 4' hole in a 2x12 stem wall.
Thanks, Oly!
 The
Electricity The
Electricity
Fans need electricity and outside fans need outside electricity.
Once again I was in luck to have an outside electrical outlet
already installed about 7 feet from the fan. The fan came with
no cord, so I used # 12 solid wire in outdoor conduit, hot,
neutral and ground, with an weather-proof on-off switch just
incase I needed to turn off the fan in an emergency. I used
outdoor flex conduit between the switch and the fan.
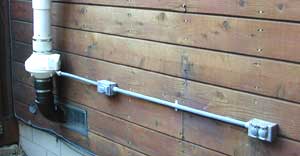
The
Vent Pipe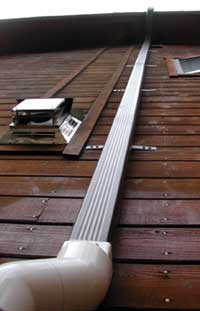
Though I used an insullated pipe system when I first installed
my radon mitigation system, I leaned that the use of simple
metal rain gutter downspout pipe works the best. I obtained
the downspout from a company in Colorado with the special fittings
that attach it to the round 4 inch PVC 45 degree couplings.
Very simple and natural looking. At least brown downspout looks
better than large white round pipe going up the side of the
house.
The
Top Vent
Venting radon up and out does not send it over to the neighbors
but just disperses it into the air. Remember, it is the concentration
of radon gas in a closed environment that is the problem. The
best way to get the gas to disperse is to vent it up to the
top of the roof with no top cap to restrict the flow. the forceful
flow of air keeps most rain and snow out. If rain or snow does
get in, it will drain out the bottom drain holes above the motor.
At least that's what the book says. This winter will tell the
real story! More pictures in the spring.
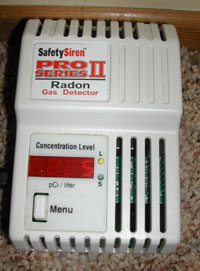
The
Results
It took about a week to see the radon numbers change on my digital
LED display. That was because I had not quite understood what
the two modes on the Series II radon detector meant. I had it
set to "long term" and it was reading 5. At the end
of the week I tried it to "short term" and it immediately
registered 1. I later learned (when all else fails, read the
manual) that the detector senses radon each hour and it averages
those hourly readings over 7 days for short term and over how
ever long the unit had been plugged in for long term. Short
term would have been the correct setting to see the changes
immediately, but by 7 days I was getting 1 pCi/L and no annoying
alarm, so I was happy. And my family is safer. It has read 1
for the last month with only 3 days of a 2.
The
Costs
The
costs below are for my initial design using insulated vent pipe.
The 4 inch rectangular metal rain gutter with PVC adapters and
drain pipe and shipping added to the costs for me but would
be about the same as the chart below for someone keeping with
one design.
| Pro
Series II Radon Detector |
Safe
Home Products |
$99.45
|
|
Heavy
Duty Poly Tarps
to cover 1000 s.f. crawl space
|
Home
Depot |
$191.67
|
| Duct
tape - 3M |
Home
Depot |
$23.89
|
| Perforated
drain pipe 3" X 10' |
Home
Depot |
$13.88
|
| Fantech
HP2133 low volumn radon fan |
Radon
Supplies |
$133.38
|
| Polar
Pipe 25' 4" pipe |
Radon
Supplies |
$150.00
|
| Polar
Pipe insulated exhaust cap |
Radon
Supplies |
$32.10
|
| Pipe
coupling adapter 4" to 3" |
Radon
Supplies |
$12.75
|
| Pipe
coupling adapter 4" to 4" |
Radon
Supplies |
$12.75
|
| EZ
Snap Clamps 4" to anchor pipe to building |
Radon
Supplies |
$23.20
|
| Freight |
Radon
Supplies |
$69.94
|
| ABS
4" pipe, 90's and couplings |
Meeks
Lumber |
$52.26
|
| |
|
|
| |
|
|
| Total
Material |
|
$815.77
|
|
|
|
|
Labor
2 days at 6hrs, 7hrs, @ $12 / hr
+
$50 "hazard pay" mostly cutting, laying and
taping the tarp under house
|
for
helper, not counting my time |
$206.00
|
|
|
|
|
| Total
Costs |
|
$1021.77
|
Looking
Back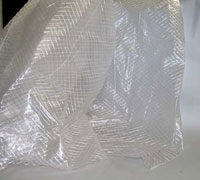
I installed this system in the Winter of 2004. In the Spring
of 2005 I took the Residental Radon Measurement Provider Course
and the Residential Radon Mitigation Provider Course from Douglas
Kladder's CERTI - Center for Environmental Research and Technology,
Inc., in Colorado Springs, Colorado. While much of my do-it-yourself
design worked to lower my radon readings, there are certain
things that I would do differently. I would not use plastic
tarps from Home Depot, but would use special rolls of ground
cloth and special adhesive to make better seals than duct tape
could ever do. I may eventually re-do the crawl space if radon
levels ever rise above 1. But for now I am living with it as
it is and the reduction in radon from 5 to 1 is an indication
that even a less than perfect job produces good results.
 Many
supply companies sell a 6 mil. crawl space barrier that comes
in 20' x 100' rolls that would have meant less seams to seal.
There are various adhesive that seal the edges of the plastic
sheeting so I would not have had to use any duct tape, or at
least not much. Cost wise, the tarps cost me $191 at Home Depot
while a roll of crawl space barrier would have cost me $150
plus about $15 in shipping. The duct tape cost me $24 while
the spray would have been $10. The savings would have been around
$40, and it would have been easier to install, so I would have
saved some on labor (plus the wear and tear on me!) but the
big reward would have been a more gas resistant, air tight finished
product. Many
supply companies sell a 6 mil. crawl space barrier that comes
in 20' x 100' rolls that would have meant less seams to seal.
There are various adhesive that seal the edges of the plastic
sheeting so I would not have had to use any duct tape, or at
least not much. Cost wise, the tarps cost me $191 at Home Depot
while a roll of crawl space barrier would have cost me $150
plus about $15 in shipping. The duct tape cost me $24 while
the spray would have been $10. The savings would have been around
$40, and it would have been easier to install, so I would have
saved some on labor (plus the wear and tear on me!) but the
big reward would have been a more gas resistant, air tight finished
product.
I
also would have gone straight for the air vent to get the 4"
ABS pipe to the outside, without spending time and money on
adapters to try and size the 3" drain pipe down to a 2"
hole and back up to a 4" pipe at the fan.
As
in all projects, you may want to check on the price of having
the work done professionally before you decide to do the job
yourself, if you can find anyone. In my case, I just thought
I could do it myself, so I jumped in without checking on professional
help. As it turned out it was not too difficult and it did the
trick of lowering the radon levels, which was the goal. Hopefully
you can learn from my mistakes and my research, so you will
likely get a better job at cheaper price. But, if you do hire
it out, check references, certifications, and licenses and beware
of house repair rip-offs. Good Luck!
Deadly
Back Drafts
After taking the Residential Radon Measurement Provider Course
and the Residential Radon Mitigation Provider Course, I have
discovered many ways to improve this installation. The most
important safety issue is to test for back drafts from gas appliances
when de-pressurizing a crawl space or foundation slab.
Carbon monoxide poisoning is a deadly mistake you don't want
to make. Learn how to test for it or hire a professional.
Reasons For NOT Installing the Radon Fan in the Living Space
I am often asked by homeowners if it is ok to install a radon fan in the crawl space or in a closet to accomodate an easy installation. Several members of the Radon Professional List Serv sounded off (in February, 2010) on the question of why not to install a radon fan in the living space. I incorporated that discussion into one document as a resource when this question comes up again. This is not the end to the discussion, of course, but these radon professionals make some compelling arguments for sticking with EPA protocols.
The consensus is to follow EPA guidelines and keep the radon fan outside or above the living space, as in the attic. But not to put it in the basement, crawl-space or interior closet.
Read the reasons
2010
Make-Over
It took a few years to want to go back in and re-do the crawl
space, especially since the radon readings were (and are) still
in the 1's, but I finally decided to hire it out to get it done
right. I hired a certified radon contractor to replace plastic
tarps with the correct radon barrier cloth (we actually just
left the tarps under the barrier cloth) using the correct polyurathane
adhesive and also removing any contact with wood (to avoid the
chance that termites might be active in any wood out of sight
under the barrier cloth. Here are the current (as of 3-28-12)
pictures of the finished and hopefully in spec crawl space.
It is interesting to note that correcting the original tarp
job has not altered or improved the functioning of the system.
It still remains at between .07 and 2.0 pCi/L.
|